Saturday, March 10, 2012
Revisiting a single InfoWindow setup
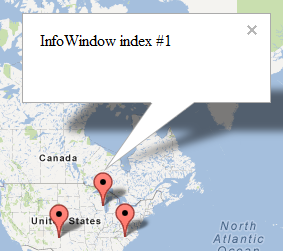
Instead of keeping track of several InfoWindows, we can store the information with each marker and use only one global InfoWindow.
Global variables:
var infowindow;
var count = 0;
Event listener and InfoWindow creation:
function initialize() {
map = new google.maps.Map($("map_canvas"), mapOptions);
google.maps.event.addListener(map, 'click', function (event) {
addMarker(event.latLng, "InfoWindow index #" + count);
count += 1;
});
infowindow = new google.maps.InfoWindow({ });
}
Defining a marker:
function addMarker(pos, content) {
var marker = new google.maps.Marker({
map: map,
position: pos
});
When clicked, the marker opens the InfoWindow with the current content.
google.maps.event.addListener(marker, 'click', function (event) {
infowindow.setContent(content);
infowindow.open(map, marker);
});
}
Full source code:
Thursday, March 8, 2012
Zooming in with a window
I often get tired of using the scroll wheel to zoom, and get too lazy to move the mouse to the zoom slider. Here's an alternative to these zoom methods: define a zoom window to cover an area of interest.
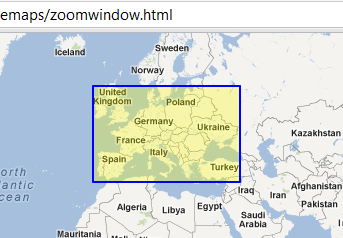
Left-click to define a corner, let go, and move the mouse to draw the zoom window. Click again to zoom in. Right-click to cancel an open rectangle. Double right-click to zoom out (this behavior is standard).
In the definitions, I add a two helper functions to simplify the creation of LatLngs and LatLngBounds.
var map;
var mapOptions = {
center: new google.maps.LatLng(0.0, 0.0),
zoom: 2,
mapTypeId: google.maps.MapTypeId.ROADMAP
};
var state = 0;
var bounds;
var pt1, pt2;
var rect;
function toLatLng(lat, lng) {
return new google.maps.LatLng(lat, lng);
}
function toBounds(j,k) {
var pts = [];
var latMin, latMax, lngMin, lngMax;
var sw, ne;
latMin = Math.min(j.lat(), k.lat());
latMax = Math.max(j.lat(), k.lat());
lngMin = Math.min(j.lng(), k.lng());
lngMax = Math.max(j.lng(), k.lng());
sw = toLatLng(latMin, lngMin);
ne = toLatLng(latMax, lngMax);
return new google.maps.LatLngBounds(sw, ne);
}
The initialize() function defines the map and the Rectangle's style. To minimize the effects of Internet Explorer's slow refresh, the size is fixed around (0,0).
Next, a click listener on the map serves to place the first corner of the zoom window. The 'state' variable keeps track of whether the zoom window is open or not.
google.maps.event.addListener(map, 'click', function(event) {
if(state == 0) {
pt1 = event.latLng;
rect.setMap(map);
state = 1;
}
});
With movement (mousemove), the Rectangle (zoom window) resizes according to the current position:
google.maps.event.addListener(map, 'mousemove', function(event) {
if(rect.getMap() == map) {
rect.setBounds(toBounds(pt1, event.latLng));
}
});
Finally, if another click is detected (note that once the Rectangle is visible, it lies on top of the map) the Rectangle is hidden and the map is zoomed in.
google.maps.event.addListener(rect, 'click', function(event) {
rect.setMap(null);
rect.setBounds(toBounds(toLatLng(0.0, 0.0), toLatLng(0.000001,0.000001)));
pt2 = event.latLng;
map.fitBounds(toBounds(pt1, pt2));
state = 0;
});
Finally, we add some behavior to correct the size of the zoom window. If movement is detected in the direction of the Rectangle, its size is reduced.
// Allows shrinking the zoom window
google.maps.event.addListener(rect, 'mousemove', function(event) {
if(rect.getMap() == map) {
rect.setBounds(toBounds(pt1, event.latLng));
}
});
and right-click closes an open Rectangle.
// Cancel the zoom window with a left click
google.maps.event.addListener(rect, 'rightclick', function(event) {
rect.setMap(null);
rect.setBounds(toBounds(toLatLng(0.0, 0.0), toLatLng(0.000001,0.000001)));
state = 0;
});
Full source code:
Friday, March 2, 2012
Keeping a single InfoWindow open
For a long time I couldn't find a good solution for this scenario: keep multiple markers on the map, with a corresponding InfoWindow assigned to each marker. At most one InfoWindow should stay open. (Here's another way of accomplishing this)
In addition to the map, we declare a global array variable, infowindows. Accessing this variable allows us to close all InfoWindows.
When initializing the map, we add a click listener so we can place markers.
function initialize() {
map = new google.maps.Map($("map_canvas"), mapOptions);
google.maps.event.addListener(map, 'click', function (event) {
addMarker(event.latLng, "InfoWindow index #" + infowindows.length);
});
}
When adding markers, we also add the InfoWindow and its contents at the same time.
function addMarker(pos, content) {
var marker = new google.maps.Marker({
map: map,
position: pos
});
var infowindow = new google.maps.InfoWindow({
content: content
});
infowindows.push(infowindow);
google.maps.event.addListener(marker, 'click', function (event) {
closeInfoWindows();
infowindow.open(map, marker);
});
}
Finally, we define a simple function that closes all InfoWindows. Without an array to keep track of them, we cannot locate the previously opened InfoWindow(s).
function closeInfoWindows() {
for (var i = 0; i < infowindows.length; i++) {
infowindows[i].close();
}
}
Full source code:
Wednesday, February 29, 2012
Measuring distance with markers
https://files.nyu.edu/hc742/public/googlemaps/distance2.html
Double-click to remove point, click on line to add intermediary point.
maps.google.com has a tool that measures the distance along a path created by successive mouse clicks. To activate the tool, open the Maps Labs link (at the bottom of the left sidebar), activate the Distance Measurement Tool, and then click on the small icon at the bottom left corner of the map.

Once active, clicking on the map allows you to draw a path, whose distance will be shown on the sidebar.
A reproduction of this tool uses Markers, a Polyline, the Geometry library, and some event listeners.
Click on the map to add Markers. A path will be drawn between the markers, and return the distance of the path. Drag a marker to change the path, and double-click one to delete it.

First we declare a marker array and the polyline:
function initialize() {
var map;
var mapOptions = {
center: new google.maps.LatLng(42.3584308, -71.0597732),
zoom: 16,
mapTypeId: google.maps.MapTypeId.ROADMAP
};
var markers = [];
var line;
A difference between this distance measurement tool and the Labs tool is that we will allow points along the path to be dragged and deleted.
Markers are added in the map event listener activated by clicks, and for each of these new Markers, a double-click (for its deletion) and drag listener is added.
google.maps.event.addListener(map, 'click', function(event) {
var marker = new google.maps.Marker({
map: map,
position: event.latLng,
draggable:true
});
markers.push(marker);
drawPath();
google.maps.event.addListener(marker, 'dblclick', function(event) {
marker.setMap(null);
drawPath();
});
google.maps.event.addListener(marker, 'drag', function(event) {
drawPath();
});
});
Note that marker.setMap(null) removes the marker from view, though it remains in our markers[] array. Managing this array is done in the following function:
function countMarkers() {
count = 0;
for (var i = markers.length - 1; i >= 0; i--) {
if (markers[i].getMap() == null) {
markers.splice(i, 1);
} else {
count++;
}
}
return count;
}
We wish to remove all markers whose map is set to null, and because removing an item shifts subsequent items to the left, we traverse the array backwards. Otherwise, we would run out of bounds after removing any single (or more) item from the middle of the array. splice removes one item (amount given in the second argument) at index i.
Next, knowing where all our active points are, we pass this information to update the Polyline display.
function drawPath() {
countMarkers();
var coords = [];
for (var i = 0; i < markers.length; i++) {
coords.push(markers[i].getPosition());
}
line.setPath(coords);
meters = google.maps.geometry.spherical.computeLength(coords);
$("distKm").value = Math.round(meters/1000 * 100) / 100;
$("distMi").value = Math.round(meters/1609 * 100) / 100;
}
At the same time, the distance is measured with the geometry library, using a simple call to computeLength. The result is in meters, and conversions to kilometers and miles are done to update the textboxes. Finally, a straightforward function clears all the markers.
function clearMarkers() {
for (var i = 0; i < markers.length; i++) {
markers[i].setMap(null)
}
drawPath();
}
The HTML form looks like this:
<form id="form">
<input id="distKm" type="text"> km<br />
<input id="distMi" type="text"> miles<br />
<input id="button1" type="button" value="Clear markers" onclick="clearMarkers()">
</form>
Full source code:
Double-click to remove point, click on line to add intermediary point.
maps.google.com has a tool that measures the distance along a path created by successive mouse clicks. To activate the tool, open the Maps Labs link (at the bottom of the left sidebar), activate the Distance Measurement Tool, and then click on the small icon at the bottom left corner of the map.
Once active, clicking on the map allows you to draw a path, whose distance will be shown on the sidebar.
A reproduction of this tool uses Markers, a Polyline, the Geometry library, and some event listeners.
Click on the map to add Markers. A path will be drawn between the markers, and return the distance of the path. Drag a marker to change the path, and double-click one to delete it.
First we declare a marker array and the polyline:
function initialize() {
var map;
var mapOptions = {
center: new google.maps.LatLng(42.3584308, -71.0597732),
zoom: 16,
mapTypeId: google.maps.MapTypeId.ROADMAP
};
var markers = [];
var line;
A difference between this distance measurement tool and the Labs tool is that we will allow points along the path to be dragged and deleted.
Markers are added in the map event listener activated by clicks, and for each of these new Markers, a double-click (for its deletion) and drag listener is added.
google.maps.event.addListener(map, 'click', function(event) {
var marker = new google.maps.Marker({
map: map,
position: event.latLng,
draggable:true
});
markers.push(marker);
drawPath();
google.maps.event.addListener(marker, 'dblclick', function(event) {
marker.setMap(null);
drawPath();
});
google.maps.event.addListener(marker, 'drag', function(event) {
drawPath();
});
});
Note that marker.setMap(null) removes the marker from view, though it remains in our markers[] array. Managing this array is done in the following function:
function countMarkers() {
count = 0;
for (var i = markers.length - 1; i >= 0; i--) {
if (markers[i].getMap() == null) {
markers.splice(i, 1);
} else {
count++;
}
}
return count;
}
We wish to remove all markers whose map is set to null, and because removing an item shifts subsequent items to the left, we traverse the array backwards. Otherwise, we would run out of bounds after removing any single (or more) item from the middle of the array. splice removes one item (amount given in the second argument) at index i.
Next, knowing where all our active points are, we pass this information to update the Polyline display.
function drawPath() {
countMarkers();
var coords = [];
for (var i = 0; i < markers.length; i++) {
coords.push(markers[i].getPosition());
}
line.setPath(coords);
meters = google.maps.geometry.spherical.computeLength(coords);
$("distKm").value = Math.round(meters/1000 * 100) / 100;
$("distMi").value = Math.round(meters/1609 * 100) / 100;
}
At the same time, the distance is measured with the geometry library, using a simple call to computeLength. The result is in meters, and conversions to kilometers and miles are done to update the textboxes. Finally, a straightforward function clears all the markers.
function clearMarkers() {
for (var i = 0; i < markers.length; i++) {
markers[i].setMap(null)
}
drawPath();
}
The HTML form looks like this:
<form id="form">
<input id="distKm" type="text"> km<br />
<input id="distMi" type="text"> miles<br />
<input id="button1" type="button" value="Clear markers" onclick="clearMarkers()">
</form>
Full source code:
Friday, February 24, 2012
Finding the address for a given spot
Reverse geocoding estimates the address of a given map point. Result accuracy depends on what information is stored in Google Maps servers.
In this example, an address will be returned after each mouse click anywhere on land.
Click here to open
In addition to the minimal initialization with global variables map and geocoder, an event listener is added to initialize().
function initialize() {
geocoder = new google.maps.Geocoder();
map = new google.maps.Map($("map_canvas"),
mapOptions);
google.maps.event.addListener(map, 'click',
function(event) {
getAddress(event.latLng);
}
);
}
The HTML body contains a form with a text field for the retrieved address, and two zoom controls. By default, the map is zoomed and centered with a mouse click.
A mouse click calls getAddress with the captured latLng. The geocoder checks for two things: whether there is a result for the location, and the status of the geocoding request. In this example, if either value returns zero or not OK, the error is shown in the address field.
function getAddress(latLng) {
geocoder.geocode(
{latLng: latLng},
function(results, status) {
if(status == google.maps.GeocoderStatus.OK) {
if(results[0]) {
$("text_address").value =
results[0].formatted_address;
// zoom controls, of secondary importance
if(map.getZoom() < 16) {
if($("autoZoom").checked) {
map.setCenter(latLng);
map.setZoom(map.getZoom() + 2);
}
}
}
else {
$("text_address").value = "No results";
}
}
else {
$("text_address").value = status;
}
}
);
}
Friday, February 17, 2012
Adding markers for given locations
Today I'll cover the first example given in this documentation page. Try interacting with the map below. For the given scale, cities show up best in the map, although street addresses all the way to continent names will be recognized.
Click here to open
First, we have the standard header and JavaScript include for the Google Maps API.
<!DOCTYPE html>
<html>
<head>
<script type="text/javascript" src="http://maps.googleapis.com/maps/api/js?sensor=false"></script>
Next, before defining the initialize() function, both map and geocoder variables should be declared global, because they will be called from more than one function. The geocoder is initialized with the map.
<script type="text/javascript">
var map;
var geocoder;
mapCenter = new google.maps.LatLng(39.11, 0.94);
function initialize() {
geocoder = new google.maps.Geocoder();
map = new google.maps.Map(document.getElementById("map_canvas"),
{ center: mapCenter,
zoom: 1,
mapTypeId: google.maps.MapTypeId.ROADMAP
});
}
The HTML body and form contain calls to two map functions, addMarkers() and zoomout().
<body onload="initialize()">
Add a list of cities in the text box, one per line:
<form action="#">
<textarea rows="4" cols="50" id="cityList">Chicago
Taipei
Curitiba</textarea><br>
<input type="button" value="Clear text" onclick="document.getElementById('cityList').value=''">
<input type="button" value="Add markers" onclick="addMarkers(document.getElementById('cityList').value)">
<input type="button" value="Zoom out" onclick="zoomout()">
</form>
<div id="map_canvas" style="width:500px; height:300px"></div>
</body>
zoomout() is straightforward, and uses the global variable mapCenter:
function zoomout() {
map.setZoom(1);
map.setCenter(mapCenter);
}
The core function, addMarkers, does two things:
var cities = cityList.split('\n');
for (var i = 0; i < cities.length; i++) {
geocoder.geocode(
{ address: cities[i] },
function(results, status) {
var marker = new google.maps.Marker({
map: map,
position: results[0].geometry.location
})
google.maps.event.addListener(marker, 'click',
function(event) {
map.setCenter(event.latLng);
map.setZoom(8);
});
}
);
}
}
For each city in our list, we use the geocoder to accept a city name, such as "Sacramento," and convert it to a latitude and longitude that is used to place a marker. The first argument, given in curly braces, is the GeocodeRequest object literal. Passing a (human-readable) address returns a latitude and longitude, and vice-versa.
Following the request is the function that holds the return value, in our case, the latitude and longitude for each address. Note that we are ignoring the status code here. First, we can place a marker with the geometry.location field, whose type is latLng.
Once a marker is set, an event listener can be added. The first parameter is the object receiving the listener, the second, an event type (found here under "Events" for each class), and the third parameter, the function to be executed when the event is triggered.
Click here to open
First, we have the standard header and JavaScript include for the Google Maps API.
<!DOCTYPE html>
<html>
<head>
<script type="text/javascript" src="http://maps.googleapis.com/maps/api/js?sensor=false"></script>
Next, before defining the initialize() function, both map and geocoder variables should be declared global, because they will be called from more than one function. The geocoder is initialized with the map.
<script type="text/javascript">
var map;
var geocoder;
mapCenter = new google.maps.LatLng(39.11, 0.94);
function initialize() {
geocoder = new google.maps.Geocoder();
map = new google.maps.Map(document.getElementById("map_canvas"),
{ center: mapCenter,
zoom: 1,
mapTypeId: google.maps.MapTypeId.ROADMAP
});
}
The HTML body and form contain calls to two map functions, addMarkers() and zoomout().
<body onload="initialize()">
Add a list of cities in the text box, one per line:
<form action="#">
<textarea rows="4" cols="50" id="cityList">Chicago
Taipei
Curitiba</textarea><br>
<input type="button" value="Clear text" onclick="document.getElementById('cityList').value=''">
<input type="button" value="Add markers" onclick="addMarkers(document.getElementById('cityList').value)">
<input type="button" value="Zoom out" onclick="zoomout()">
</form>
<div id="map_canvas" style="width:500px; height:300px"></div>
</body>
zoomout() is straightforward, and uses the global variable mapCenter:
function zoomout() {
map.setZoom(1);
map.setCenter(mapCenter);
}
The core function, addMarkers, does two things:
- add markers for each location given by the user, line by line
- set up mouse click event listeners for each marker to center the map to itself and zoom in
var cities = cityList.split('\n');
for (var i = 0; i < cities.length; i++) {
geocoder.geocode(
{ address: cities[i] },
function(results, status) {
var marker = new google.maps.Marker({
map: map,
position: results[0].geometry.location
})
google.maps.event.addListener(marker, 'click',
function(event) {
map.setCenter(event.latLng);
map.setZoom(8);
});
}
);
}
}
For each city in our list, we use the geocoder to accept a city name, such as "Sacramento," and convert it to a latitude and longitude that is used to place a marker. The first argument, given in curly braces, is the GeocodeRequest object literal. Passing a (human-readable) address returns a latitude and longitude, and vice-versa.
Following the request is the function that holds the return value, in our case, the latitude and longitude for each address. Note that we are ignoring the status code here. First, we can place a marker with the geometry.location field, whose type is latLng.
Once a marker is set, an event listener can be added. The first parameter is the object receiving the listener, the second, an event type (found here under "Events" for each class), and the third parameter, the function to be executed when the event is triggered.
Thursday, February 16, 2012
Getting started
There are a few different ways of adding Google Maps content to your website:
If you only need markers and static content, the easiest way is to find the desired location directly on http://maps.google.com/ and add any markers, lines and shapes with the "My places" option (you need a Google account to use this feature).
Next, embedding from maps.google.com is very simple. In that website, click on the link icon (circled below) and copy the given links.

Another straightforward option is going to Google Web Elements and choosing Maps under the Search tab. I find this option more limited because only one marker may be added.
Finally, there is Google Maps API, the focus of this blog (specifically the Javascript API). The following map is stored in my NYU web space. This page is merely a copy of the "Hello World" example from Google Maps API's tutorial page.
Click here to open
If you only need markers and static content, the easiest way is to find the desired location directly on http://maps.google.com/ and add any markers, lines and shapes with the "My places" option (you need a Google account to use this feature).
Next, embedding from maps.google.com is very simple. In that website, click on the link icon (circled below) and copy the given links.
Another straightforward option is going to Google Web Elements and choosing Maps under the Search tab. I find this option more limited because only one marker may be added.
Finally, there is Google Maps API, the focus of this blog (specifically the Javascript API). The following map is stored in my NYU web space. This page is merely a copy of the "Hello World" example from Google Maps API's tutorial page.
Click here to open
Subscribe to:
Posts (Atom)